
338 lines
14 KiB
Markdown
338 lines
14 KiB
Markdown

|
||

|
||

|
||

|
||

|
||

|
||

|
||
|
||
<h1 align="center"><a href="https://bluewavelabs.ca" target="_blank">BlueWave Uptime</a></h1>
|
||
|
||
<p align="center"><strong>An open source server monitoring application</strong></p>
|
||
|
||

|
||
(yes, we have a light theme as well, but this looks better on readme.md)
|
||
|
||
BlueWave Uptime is an open source server monitoring application used to track the operational status and performance of servers and websites. It regularly checks whether a server/website is accessible and performs optimally, providing real-time alerts and reports on the monitored services' availability, downtime, and response time.
|
||
|
||
## Demo
|
||
|
||
See [BlueWave Uptime](https://uptime-demo.bluewavelabs.ca/) in action. The username is uptimedemo@demo.com and the password is Demouser1!
|
||
|
||
## Features
|
||
|
||
- [x] Completely open source, deployable on your servers
|
||
- [x] Website monitoring
|
||
- [x] Port monitoring
|
||
- [x] Ping monitoring
|
||
- [x] Incidents at a glance
|
||
- [x] Page speed monitoring
|
||
- [x] E-mail notifications
|
||
- [ ] Scheduled maintenance (in the works)
|
||
|
||
**Roadmap (short term):**
|
||
|
||
- [ ] Memory, disk and CPU monitoring
|
||
- [ ] 3rd party integrations
|
||
- [ ] DNS monitoring
|
||
- [ ] SSL monitoring
|
||
|
||
**Roadmap (long term):**
|
||
|
||
- [ ] Status pages
|
||
|
||
## Tech stack
|
||
|
||
- [ReactJs](https://react.dev/)
|
||
- [MUI (React framework)](https://mui.com/)
|
||
- [Node.js](https://nodejs.org/en)
|
||
- [MongoDB](https://mongodb.com)
|
||
|
||
## Contributing
|
||
|
||
We love contributors. Here's how you can contribute:
|
||
|
||
- Check [Contributor's guideline](https://github.com/bluewave-labs/bluewave-uptime/blob/master/CONTRIBUTING.md).
|
||
- Have a look at our Figma designs [here](https://www.figma.com/design/RPSfaw66HjzSwzntKcgDUV/Uptime-Genie?node-id=0-1&t=WqOFv9jqNTFGItpL-1). We encourage you to copy to your own Figma page, then work on it as it is read-only.
|
||
- Open an issue if you believe you've encountered a bug
|
||
- Make a pull request to add new features/make quality-of-life improvements/fix bugs.
|
||
|
||
<a href="https://github.com/bluewave-labs/bluewave-uptime/graphs/contributors">
|
||
<img src="https://contrib.rocks/image?repo=bluewave-labs/bluewave-uptime" />
|
||
</a>
|
||
|
||
Made with [contrib.rocks](https://contrib.rocks).
|
||
|
||
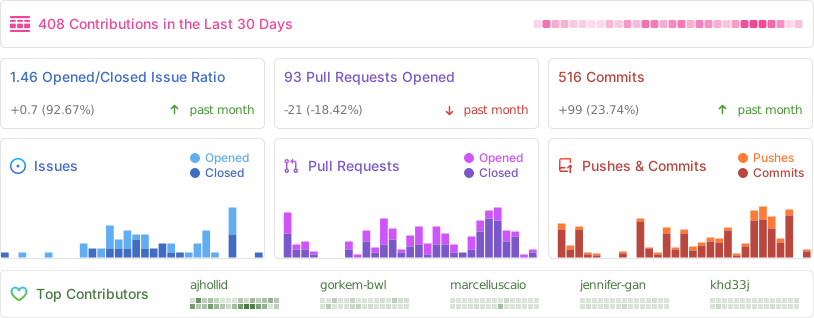
|
||
|
||
[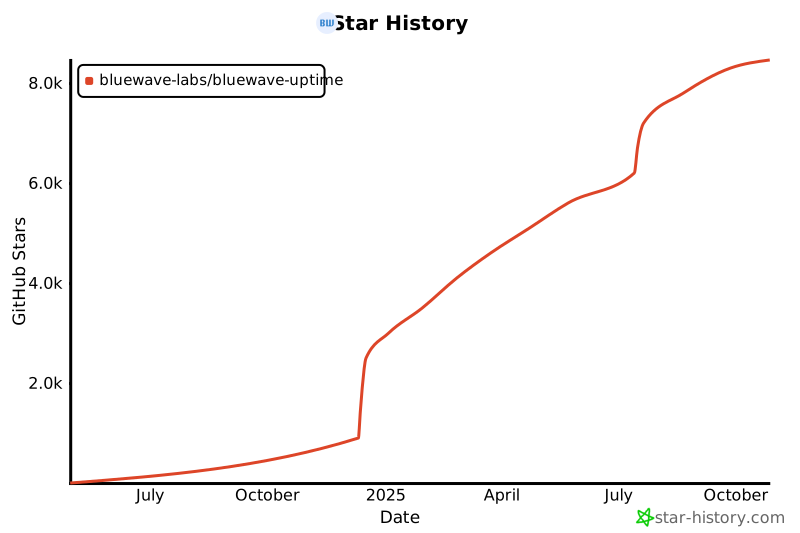](https://star-history.com/#bluewave-labs/bluewave-uptime&Date)
|
||
|
||
Also check other developer and contributor-friendly projects of BlueWave:
|
||
|
||
- [BlueWave HRM](https://github.com/bluewave-labs/bluewave-hrm)
|
||
- [BlueWave Onboarding](https://github.com/bluewave-labs/bluewave-onboarding)
|
||
- [BlueWave DataRoom](https://github.com/bluewave-labs/bluewave-dataroom)
|
||
- [VerifyWise](https://github.com/bluewave-labs/verifywise)
|
||
|
||
## Getting Started
|
||
|
||
- Clone this repository to your local machine
|
||
|
||
1. [Quickstart for Users](#user-quickstart)
|
||
1. [Quickstart for Developers](#dev-quickstart)
|
||
1. [Docker Compose](#docker-compose)
|
||
1. [Installation (Client)](#client)
|
||
1. [Configuration(Client)](#config-client)
|
||
- [Environment](#env-vars-client)
|
||
1. [Getting Started (Server)](#server)
|
||
- [Install Server](#install-server)
|
||
- [Environment](#env-vars-server)
|
||
- [Database](#databases)
|
||
- [(Optional) Dockerised Databases](#optional-docker-databases)
|
||
- [Start Server](#start-server)
|
||
1. [API Documentation](#api-documentation)
|
||
1. [Error Handling](#error-handling)
|
||
1. [Contributors](#contributors)
|
||
|
||
---
|
||
|
||
#### <u> Quickstart for Users</u><a id="user-quickstart"></a>
|
||
|
||
1. Download our [Docker Compose File](/Docker/quickstart/docker-compose.yaml)
|
||
2. Download our [Quickstart script](/Docker/quickstart/quickstart.sh)
|
||
3. Place these files in a directory of your choice
|
||
4. Run `quickstart.sh` and generate config files
|
||
5. Run `docker compose up` to start the application
|
||
6. Application is running at `http://localhost`
|
||
|
||
#### <u>Quickstart for Developers</u> <a id="dev-quickstart"></a>
|
||
|
||
<span style="color: red; font-weight: bold;">MAKE SURE YOU CD TO THE SPECIFIED DIRECTORIES AS PATHS IN COMMANDS ARE RELATIVE</span>
|
||
|
||
##### Cloning and Initial Setup
|
||
|
||
1. Clone this repository
|
||
2. Checkout the `develop` branch `git checkout develop`
|
||
|
||
##### Docker Images Setup
|
||
|
||
3. <span style="color: red; font-weight: bold;">CD</span> to the `Docker` directory
|
||
4. Run `docker run -d -p 6379:6379 -v $(pwd)/redis/data:/data --name uptime_redis uptime_redis`
|
||
5. Run `docker run -d -p 27017:27017 -v $(pwd)/mongo/data:/data/db --name uptime_database_mongo uptime_database_mongo`
|
||
|
||
##### Server Setup
|
||
|
||
6. <span style="color: red; font-weight: bold;">CD</span> to `Server` directory, run `npm install`
|
||
7. While in `Server` directory, create a `.env` file with the [required environmental variables](#env-vars-server)
|
||
8. While in the `Server` directory, run `npm run dev`
|
||
|
||
##### Client Setup
|
||
|
||
9. <span style="color: red; font-weight: bold;">CD</span> to `Client` directory `run npm install`
|
||
10. While in the `Client` directory, create a `.env` file with the [required environmental variables](#env-vars-client)
|
||
11. While in the `Client` cirectory run `npm run dev`
|
||
|
||
##### Access Application
|
||
|
||
12. Client is running at `localhost:5173`
|
||
13. Server is running at `localhost:5000`
|
||
|
||
---
|
||
|
||
#### <u>Docker Compose</u> <a id="docker-compose"></a>
|
||
|
||
The fastest way to start the application is to use our Dockerfiles and [Docker Compose](https://docs.docker.com/compose/).
|
||
|
||
To get the application up and running you need to:
|
||
|
||
1. In the `Docker` directory run the build script `build_images.sh` to build docker images for the client, server, Redis database, and MongoDB database.
|
||
|
||
2. In the `Dokcer` directory create a `mongo.env` file with a username and password:
|
||
|
||
```
|
||
USERNAME_ENV_VAR=user
|
||
PASSWORD_ENV_VAR=password
|
||
```
|
||
|
||
3. In the `Docker` directory, create a `server.env` file with the [requried environmental variables](#env-vars-server) for the server. Sample file:
|
||
|
||
```
|
||
CLIENT_HOST="http://localhost:5173"
|
||
JWT_SECRET=<jwt_secret>
|
||
DB_TYPE="MongoDB"
|
||
DB_CONNECTION_STRING="mongodb://<username>:<password>@mongodb:27017/uptime_db"
|
||
REDIS_HOST="redis"
|
||
REDIS_PORT=6379
|
||
TOKEN_TTL="99d"
|
||
PAGESPEED_API_KEY=<api_key>
|
||
SYSTEM_EMAIL_HOST="smtp.gmail.com"
|
||
SYSTEM_EMAIL_PORT=465
|
||
SYSTEM_EMAIL_ADDRESS=<system_email>
|
||
SYSTEM_EMAIL_PASSWORD=<system_email_password>
|
||
```
|
||
|
||
4. In the `Client` directory, create a `client.env` file with the [required environmental variables](#env-vars-client) for the client. Sample file:
|
||
|
||
```
|
||
VITE_APP_API_BASE_URL="http://localhost:5000/api/v1"
|
||
VITE_APP_API_LOG_LEVEL="debug"
|
||
```
|
||
|
||
5. In the `Docker` directory run `docker compose up` to run the `docker-compose.yaml` file and start all four images.
|
||
|
||
That's it, the application is ready to use on port 80.
|
||
<br/>
|
||
|
||
### Client
|
||
|
||
#### <u>Installation</u>
|
||
|
||
1. Change directory to the `Client` directory
|
||
2. Install all dependencies by running `npm install`
|
||
|
||
<br/>
|
||
|
||
#### <u>Configuration</u> <a id="config-client"></a>
|
||
|
||
##### Environmental Variables <a id="env-vars-client"></a>
|
||
|
||
| ENV Variable Name | Required/Optional | Type | Description | Accepted Values |
|
||
| --------------------- | ----------------- | --------- | ------------------ | ---------------------------------- |
|
||
| VITE_APP_API_BASE_URL | Required | `string` | Base URL of server | {host}/api/v1 |
|
||
| VITE_APP_LOG_LEVEL | Optional | `string` | Log level | `"none"`\|`"error"` \| `"warn"` \| |
|
||
| VITE_APP_DEMO | Optional | `boolean` | Demo server or not | `true`\|`false` \| |
|
||
|
||
<br/>
|
||
|
||
#### <u>Starting Development Server</u>
|
||
|
||
1. Run `npm run dev` to start the development server.
|
||
|
||
---
|
||
|
||
### Getting Started (Server) <a id="server"></a>
|
||
|
||
#### <u>Manual Install</u> <a id="manual-install"></a>
|
||
|
||
##### Install Server <a id="install-server"></a>
|
||
|
||
1. Change directory to the `Server` directory
|
||
2. Install all dependencies by running `npm install`
|
||
|
||
<br/>
|
||
|
||
##### Environmental Variables <a id="env-vars-server"></a>
|
||
|
||
Configure the server with the following environmental variables:
|
||
|
||
| ENV Variable Name | Required/Optional | Type | Description | Accepted Values |
|
||
| --------------------- | ----------------- | --------- | ---------------------------------------- | ------------------------------------------------ |
|
||
| CLIENT_HOST | Required | `string` | Frontend Host | |
|
||
| JWT_SECRET | Required | `string` | JWT secret | |
|
||
| DB_TYPE | Optional | `string` | Specify DB to use | `MongoDB \| FakeDB` |
|
||
| DB_CONNECTION_STRING | Required | `string` | Specifies URL for MongoDB Database | |
|
||
| PORT | Optional | `integer` | Specifies Port for Server | |
|
||
| LOGIN_PAGE_URL | Required | `string` | Login url to be used in emailing service | |
|
||
| REDIS_HOST | Required | `string` | Host address for Redis database | |
|
||
| REDIS_PORT | Required | `integer` | Port for Redis database | |
|
||
| TOKEN_TTL | Optional | `string` | Time for token to live | In vercel/ms format https://github.com/vercel/ms |
|
||
| PAGESPEED_API_KEY | Optional | `string` | API Key for PageSpeed requests | |
|
||
| SYSTEM_EMAIL_HOST | Required | `string` | Host to send System Emails From | |
|
||
| SYSTEM_EMAIL_PORT | Required | `number` | Port for System Email Host | |
|
||
| SYSTEM_EMAIL_ADDRESS | Required | `string` | System Email Address | |
|
||
| SYSTEM_EMAIL_PASSWORD | Required | `string` | System Email Password | |
|
||
|
||
<br/>
|
||
|
||
##### Databases <a id="databases"></a>
|
||
|
||
This project requires two databases:
|
||
|
||
1. **Main Application Database:** The project uses MongoDB for its primary database, with a MongoDB Docker image provided for easy setup.
|
||
2. **Redis for Queue Management:** A Redis database is used for the PingService’s queue system, and a Redis Docker image is included for deployment.
|
||
|
||
You may use the included Dockerfiles to spin up databases quickly if you wish.
|
||
|
||
###### (Optional) Dockerised Databases <a id="optional-docker-databases"></a>
|
||
|
||
Dockerfiles for the server and databases are located in the `Docker` directory
|
||
|
||
<details>
|
||
<summary><b>MongoDB Image</b></summary>
|
||
|
||
Location: `Docker/mongoDB.Dockerfile`
|
||
|
||
The `Docker/mongo/data` directory should be mounted to the MongoDB container in order to persist data.
|
||
|
||
From the `Docker` directory run
|
||
|
||
1. Build the image: `docker build -f mongoDB.Dockerfile -t uptime_database_mongo .`
|
||
2. Run the docker image: `docker run -d -p 27017:27017 -v $(pwd)/mongo/data:/data/db --name uptime_database_mongo uptime_database_mongo`
|
||
|
||
</details>
|
||
<details>
|
||
<summary><b>Redis Image</b></summary>
|
||
|
||
Location `Docker/redis.Dockerfile`
|
||
|
||
the `Docker/redis/data` directory should be mounted to the Redis container in order to persist data.
|
||
|
||
From the `Docker` directory run
|
||
|
||
1. Build the image: `docker build -f redis.Dockerfile -t uptime_redis .`
|
||
2. Run the image: `docker run -d -p 6379:6379 -v $(pwd)/redis/data:/data --name uptime_redis uptime_redis`
|
||
</details>
|
||
<br/>
|
||
|
||
##### Starting the Development Server <a id="start-server"></a>
|
||
|
||
- run `npm run dev` to start the development server
|
||
|
||
OR
|
||
|
||
- run `node index.js` to start server
|
||
|
||
---
|
||
|
||
#### API Documentation<a id="api-documentation"></a>
|
||
|
||
Our API is documented in accordance with the [OpenAPI spec](https://www.openapis.org/).
|
||
|
||
You can see the documentation on your local development server at [http://localhost:{port}/api-docs](http://localhost:5000/api-docs)
|
||
|
||
You can also view the documentation on our demo server at [https://uptime-demo.bluewavelabs.ca/api-docs](https://uptime-demo.bluewavelabs.ca/api-docs)
|
||
|
||
### Error handling
|
||
|
||
Errors are returned in a standard format:
|
||
|
||
`{"success": false, "msg": "No token provided"}`
|
||
|
||
Errors are handled by error handling middleware and should be thrown with the following parameters
|
||
|
||
| Name | Type | Default | Notes |
|
||
| ------- | --------- | ---------------------- | ------------------------------------ |
|
||
| status | `integer` | 500 | Standard HTTP codes |
|
||
| message | `string` | "Something went wrong" | An error message |
|
||
| service | `string` | "Unknown Service" | Name of service that threw the error |
|
||
|
||
Example:
|
||
|
||
```
|
||
const myRoute = async(req, res, next) => {
|
||
try{
|
||
const result = myRiskyOperationHere();
|
||
}
|
||
catch(error){
|
||
error.status = 404
|
||
error.message = "Resource not found"
|
||
error.service = service name
|
||
next(error)
|
||
return;
|
||
}
|
||
}
|
||
|
||
```
|
||
|
||
Errors should not be handled at the controller level and should be left to the middleware to handle.
|